Speak My Language
Have you ever wanted to change your computer's language but weren't sure how to do that? Are you going overseas, or are currently overseas, and would like to keep your language skills up to date? Are you studying another language and would like some extra practice? These scenarios may or may not apply to you, however, in this short tutorial, I am going to show you just how you can transform your Mac or Windows 10 computer into a global experience.


Windows 10
Let's get started on changing the language settings on your Windows 10 computer. In the search box, type out "Region and Language Settings". Pressing enter on the result will pull up the below window. Under the Languages heading, click on the bar that says "Add a Language".


Windows gives you several dialects and regions to choose from for each language. For example, if you choose Spanish, you can choose versions from Latin America, Cuba, or Spain. After choosing your preferred language, Windows will actually need to download the language pack and install it before you can use it. Back in the Region & Language section, you will see that your language pack has loaded and is available. Click on its icon, and then click the "Options" button to download the language pack.

You should be able to click the "Download" button at this point. This button is at the very top of the window under "Language Options." There are several other options, such as spell-checking, handwriting, speech, and keyboards that you have the option of downloading as well, but for this tutorial we will only focus on the language pack.

When finished, your computer will send you back to the Region & Languages section where your newly downloaded language pack is ready to be installed. Click on the language heading again to click on the "Set As Default" button. If you hover over the language heading once more, Windows will let you know that your language change will take place after your next sign-in. To fully complete the process, you will need to log out and sign back in or restart your computer.
Apple Mac
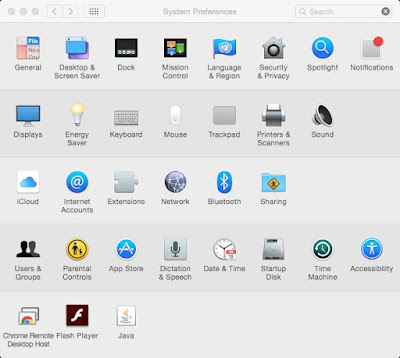
Setting up a new primary language on a Mac is fairly straightforward, but it does require you to restart your device at the end of the settings change. To begin, navigate to Systems Preferences by clicking on the Apple menu icon at the top of your home screen.
Language and Region is represented by the blue flag icon in the first row. Click that to get to the following screen. If your preferred language is not showing up in the list box, then you'll need to add it to the list by pressing the + icon in the bottom left corner. A new window will open that lists all of the different languages you can add.
After you have selected your additional language from the list, click the "Add" button to advance to this next screen. In the list box, locate your new language and drag it to the top of the list so that it displays as a Primary Language.
Once you click the red exit button in the top left-hand corner, your Mac will throw you a small popup window that will allow you the choice of finalizing your language settings. Like I mentioned previously, you will actually need to restart your computer for the changes to take effect. You can do this by clicking "Restart Now" and then wait to watch your Mac boot up in whole new language!
Windows 10 source found at: http://www.cnet.com/how-to/windows-10-settings-menu-the-time-language-tab/
* Other features such as language keyboard may be required for full language experience.


No comments: