The Schedule Wizard
Along with updates to the main Harding website, the IT department has also updated some pipeline feature as well. Scheduling classes can be an long and arduous process which was made partly easier by the old Harding scheduler. However, changes have been made which have given the scheduler a new, easy and intuitive design that is fun and easy to use. In addition to the improved look and operation of the application, there is also a new feature where you can save your classes and later upload them to your registration form so you do not have to remember or type in any CRN numbers, a tool that can come in very handy when trying to shave time off your registration process. To find and use this scheduling wizard you simply need to log in to Pipeline and follow the steps below.
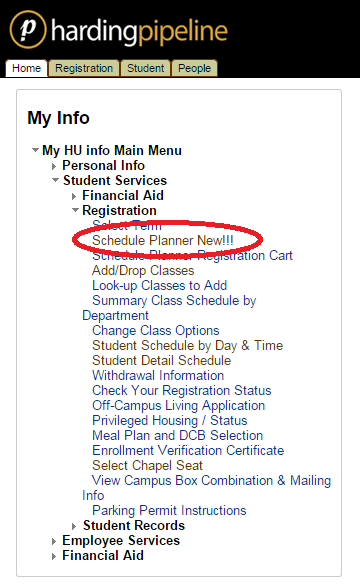
After logging in you will want to navigate to left hand side of the home screen and under the My Info section you will see a drop down menu called "Student services", clicking on that will display three more options, one of which is a link called "Schedule Planner New!!" which will take us where we want to go.

Continuing from there you will have the option to select one or more of the fourteen Harding campuses where you can take classes. Select which one you will be attending and press the "Save and Continue" button to move on.
To add courses click on the add courses link and from there you can select which subject and course you want from the drop down menus. You will also be given a description and information about that class to make sure it is what you actually want.
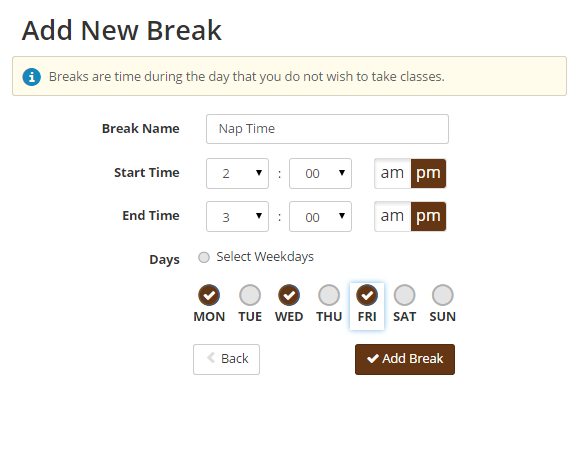
Once you are done adding all the courses click on the back button. If there are blocks of time that you want or need to block off in your schedule click on the add break button located in the middle right hand block of the main scheduling page. From here you can add as many breaks as you like by selecting what day and time that you would like to block off.
Once you are done with that, click on the back button and review that everything was added and that you're not missing anything. If everything looks good, click on the Generate Schedule button and a list of all the possible schedules will appear at the bottom.
By clicking on view you can look at the organization of the schedule and see if any of the possible organizations suit your fancy - if you've noticed you left something out you can always go back and add more breaks or classes and regenerate a schedule. If you are happy with a schedule click on the send to shopping cart button.
There will be a pop-up asking if you are okay being redirected to the shopping cart, click okay and you will be brought to the registration page. If classes are open and you are ready to register feel free to click on the "register" button. You can also add them to the work sheet which will put in all the CRN numbers in the class registration page. If classes are not open yet or you are not quite ready to register you can save your cart and come back to register for those classes at a later date.
In order to return to this cart later, you can go under the My Info > Student Services > Registration on the Pipeline home page and click on the "Schedule Planner Registration Cart" which will show you a list of all the carts you have saved.


No comments: