How to Setup Your Harding Email with Outlook
The Problem
In 2014, Google decided they were going to move everything to OAuth 2.0 authentication. What does that mean? Don't really worry about it. It's just a really fancy way of saying that Google wanted to get authorization directly from the user to access different Google services and features. Google rolled this policy out slower than Christmas, and finally imposed it to Google App accounts around mid-2016. For whatever reason, Google now describes Outlook as a "less secure app," and therefore does not immediately work with our Harding Email accounts. But have no fear, DormNet is here. We have found a way to get Outlook to work with your Harding Email. Also, do not worry about the reliability of Outlook because we still view Microsoft Outlook as a highly regarded and secure application.
You bored yet? I realize you just want Outlook to work with your Harding Email account, so go ahead and follow the steps in the solution.
The Solution
Follow these steps on Google:
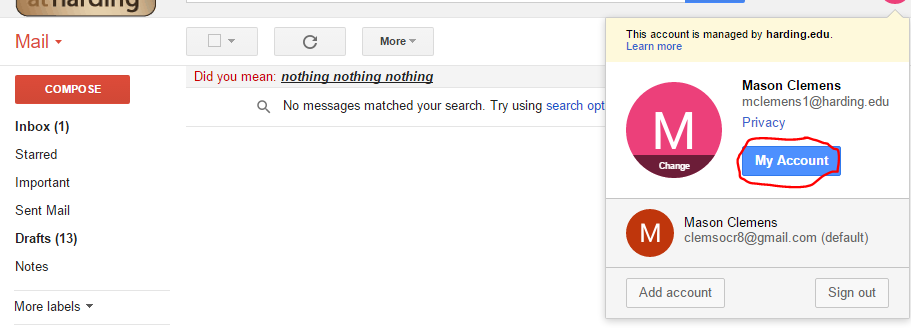
1.) You must sign into your Harding Google account. You can do this by going to Google and signing in or by signing into Pipeline and clicking the Google icon in the top right corner.2.) Click your picture icon on your Google mail screen in the top right corner.
3.) Select the "My Account" button.
4.) Select "Connected apps & sites" under "Sign-in & Security."


You are finished with the Google setup, but now you need to setup MS Outlook.
Follow these steps on Outlook:
When you open Outlook for the first time, it will bring up a wizard for you to setup your email.
1.) When it asks you if you want to setup Outlook to connect to an Email, select "Yes," and click next.

2.) The wizard then asks you to select a button. You can choose "Email account" or "Manual setup or additional server types." Select "Manual" and click next.

3.) The next page will ask you to select either "POP or IMAP" or "Exchange ActiveSync." Choose "IMAP" and click next.

4.) Then you will be asked to enter in the user information, server information, and logon information. Make it look like this:

5.) Before moving on to the next step, click "More Settings..." Then click on the tab that says, "Advanced" and change the port numbers and encrypted connection types. IMAP = 993 and SSL. SMTP = 465 and SSL. It will look like this:

6.) Then click on the "Outgoing Server" tab. Click on the checked box and select the first bubble. It should look like this:

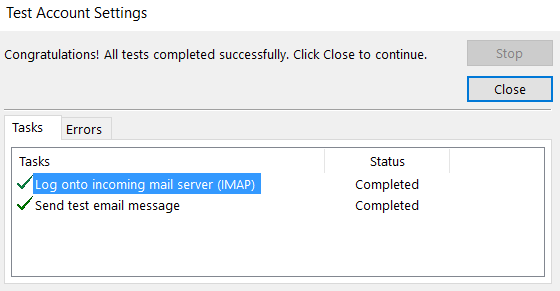
7.) After you click "OK" on the Internet Email Setting Window and click next on the wizard, Outlook will test your servers. If it works, then it will look like this.
8.) Your Outlook should be completely setup and ready to be used.
We realize this is an extensive process. If you ever have trouble following these directions, then please visit the DormNet help desk on the 2nd floor of the Administration building. We would love to help you with all of your Microsoft Outlook needs.


No comments: